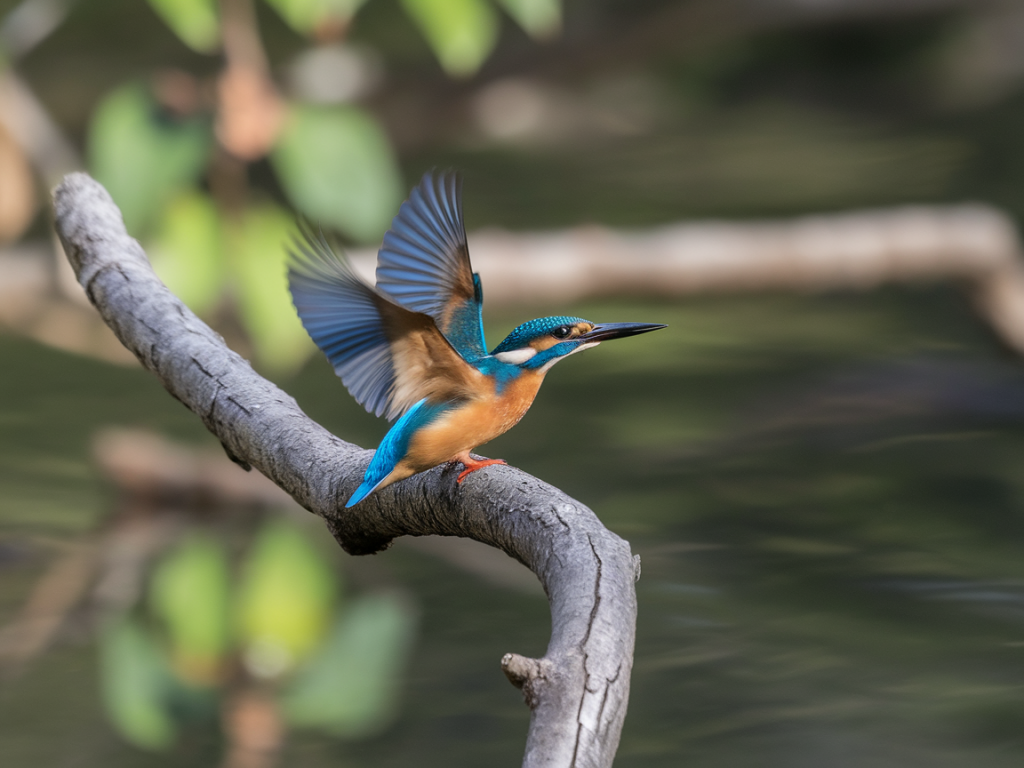
I’ll be honest: getting a usable kingfisher shot from a public footpath is one of my favourite little challenges. These birds are small, lightning-fast and intensely wary, yet with the right preparation you can capture expressive, handheld images without a hide, without trespass and without disturbing the bird. Below I’ll share the hide alternatives I use when a formal hide isn’t possible, the lens choices that consistently work for me, and how I time tides and light to put the bird in the best possible position. I’ll also cover camera settings, stabilisation tricks and, importantly, the ethical rules I follow so I don’t stress the bird or break local access rules.
Reading the scene first: where to set up from a public footpath
Before I even raise the camera, I spend 10–15 minutes watching. Kingfishers are creatures of habit — they favour specific perches and fishing lanes. From a public path I look for:
Low overhanging branches or exposed root systems that form clear perches.Slow water edges, backwaters and undercut banks where small fish are likely to be close to the surface.Sections of bank that are sheltered from the prevailing wind — kingfishers prefer calm water for hunting.If the path runs on the far side of the river, scan for perpendicular or diagonal perches that give you a longer unobstructed view. I carry a pair of binoculars and use them first — they’re quicker than walking up and down with heavy kit.
Hide alternatives when you can’t use a constructed hide
Formal hides are brilliant but rare on many footpaths. These are my go-to alternatives that keep me out of sight without blocking the public route:
Natural screen: Use a stand of reeds, bramble or alder to break your silhouette. I crouch low and position the camera so only the lens pokes through gaps. A short beanbag (stuffed dry jacket, camera jacket) helps cushion the lens and stabilise on stems.Wall or low bank: Low dry-stone walls, raised footpath kerbs or knee-high banks make excellent screens. I rest my elbows on the wall and use a small beanbag or the camera strap looped around my arm to steady a handheld tele.Bridge parapet: If the footpath crosses a bridge, the parapet can be a surprisingly good vantage. Lean your body weight into the rail and use the bridge edge as a makeshift monopod or rest.Shadow and silhouette: Position yourself in the shadow of a tree so your movement is less obvious. Kingfishers hunt in the open but are less likely to detect a dark shape against darker background.Vehicle or bench: Where permitted, sitting in a parked car (well off the path) or behind a bench can be effective. This should only be used where parking is legal and safe.Lens choices and why focal length matters
Handheld kingfisher photography is a balance between reach and manageability. Here’s a simple table of what I typically bring and why.
| Focal length | Why I use it | Typical kit |
| 300mm–400mm | Good compromise for handheld use — lighter, easier to stabilise and gives you room to work from paths. | Canon RF 100-500mm (cropped), Nikon 300mm f/4, Sony 200-600mm (on APS-C) |
| 500mm–600mm | Better reach for distant perches but becomes heavy quickly; requires excellent technique or monopod support. | Sigma 150-600mm, Canon 500mm f/4 (if you can handle the weight) |
| 70mm–200mm | Useful for closer shots and environmental context; combined with a crop sensor or 1.4x extender can work in a pinch. | Canon/Nikon/Sony 70-200mm f/2.8 |
For me, a 100-400mm or 200-600mm zoom is the most practical. It gives the flexibility to frame perched shots and to react to sudden flights. If you’re carrying a large 500mm prime, consider a lightweight carbon-fibre monopod and a gimbal head for faster target acquisition.
Camera settings for handheld kingfisher work
Kingfishers are fast. Here are the settings I default to and then tweak for conditions:
Shutter speed: 1/2000s for hovering or rapid flight; 1/1000s for a perched bird if you’re using a long lens handheld. If you have excellent IS in-lens or in-body, you can drop to 1/500s for perched shots while bracing.Aperture: f/5.6–f/8 — wide enough for a blurred background but enough depth for the bird’s head to be sharp.ISO: Let ISO float to achieve the shutter speed — I regularly shoot ISO 800–3200 in low light. Modern bodies like the Sony A7-series, Canon R or Nikon Z handle high ISO well.AF mode: Continuous AF with a small single-point or zone. I use subject-detect when available (especially bird-eye AF on Sony/Canon/Nikon) but revert to a single point when the scene is cluttered.Drive mode: High-speed continuous to capture short bursts of action; sequence frames are often the difference between a decent image and a keeper.Tide and light: timing your session for success
In coastal or estuarine sites, tide timing can determine whether kingfishers use certain perches. I plan shoots around two things:
Low tide: Exposes more banks and shallow channels where fish are visible and kingfishers hunt close to the bank — ideal for close perches.Late golden hour and early morning: Low sun creates attractive light on plumage and reduces harsh reflections on water. Avoid high zenith sun which can produce blown highlights on the river surface.Use tide apps (e.g. Magicseaweed, XTide) and local birding reports to learn which spots are productive at which tide states. If you can arrive an hour before the tide change, you often see kingfishers staking out new perches as water levels alter.
Stabilisation and support when you must stay handheld
Even the steadiest hands need help. These are my trusted aids:
Small beanbag — easily shaped between lens and vegetation or across a wall.Camera strap looped under the elbow for tensioned support.Monopod with foot tucked into the knee or used against a wall as a brace for longer lenses.In-lens or in-body stabilisation — hugely helpful. If your lens has IS modes, use the panning mode for tracking flight and standard mode for perches.Ethics and staying legal on public footpaths
I don’t take risks with wildlife or access. My rules:
Never block a public path or force other users to deviate.Keep a buffer distance — if the bird shows signs of stress (alarm calls, rapid departure, repeated perching elsewhere) I pack away.Avoid playback or lures. Kingfishers respond strongly and playback can displace others from feeding territory.Know who owns the land — on many paths you can’t legally step off the route. If you need to be off-path for a better angle, seek permission from the landowner.Photographing responsibly protects both access and the birds we love to watch.
Final practical tips I use in the field
Wear muted, non-reflective clothing and avoid bright rucksacks in sightlines.Glass the area for a while; sometimes the best shots come from patience, not movement.Practice quick framing and focus on a harmless perch first — the kingfisher often repeats patterns so get comfortable with your composition before it arrives.Keep noise to a minimum — I use a quiet mirrorless body for reduced shutter noise.With a little observation, the right kit and a respect for the bird, you can get clean, handheld kingfisher images from public footpaths. It’s one of those satisfying wins where craft meets patience — and I always leave the spot as I found it, hoping the next visitor will find their own kingfisher moment.