I’ve spent countless hours by UK rivers watching otters move through reedbeds, glide in the water and hunt along the banks. Photographing them is one of the most rewarding — and delicate — wildlife jobs you can try. Otters are curious but easily spooked: the first rule is to prioritise their wellbeing over the shot. Below I share how I approach riverbank otter photography without disturbing the animals, alternatives to full hides, and the handheld camera settings and techniques that work for me in real-world conditions.
Respect first: ethics and permissions
Before I even think about camera settings, I remind myself of three things: never force an encounter, minimise disturbance, and follow local rules. Many riverbanks are on private land or within protected areas. Always check access rights and obtain permission when needed. If you’re near a Site of Special Scientific Interest (SSSI) or a nature reserve, follow the reserve’s guidance — keep to paths, avoid sensitive zones, and obey any seasonal restrictions (especially during breeding).
Signs of disturbance to watch for — if an otter freezes, looks directly at you, dives and doesn’t reappear, or if you see increased alert behaviour over time, that’s a cue to back off. I’ll often stop shooting immediately and retreat quietly to a different location.
Approach: how to get close without spooking otters
Otters have excellent hearing, smell and a strong sense of the environment. My approach is always slow, indirect and low-profile.
Hide alternatives when you don’t want to carry a full hide
Traditional hides are great but bulky. Over the years I’ve learned several effective low-cost alternatives that keep me concealed yet mobile.
Handheld shooting: why I favour it and when to use a monopod
Handheld shooting gives me agility. Otters move quickly and unpredictably; I don’t always have time to set up a tripod. That said, incorporating a compact monopod or a beanbag when possible increases keeper rate and sharpness.
Recommended camera settings for handheld otter shots
These are settings I use as starting points. Adjust based on light, lens reach and the behaviour of the otter.
| Situation | Shutter speed | Aperture | ISO | Focus mode | Drive mode |
|---|---|---|---|---|---|
| Otter walking on bank (slow to moderate movement) | 1/500 – 1/1000s | f/4 – f/8 (depending on lens) | ISO 400 – 1600 | Continuous AF (AF-C) with a small tracking zone | Continuous high |
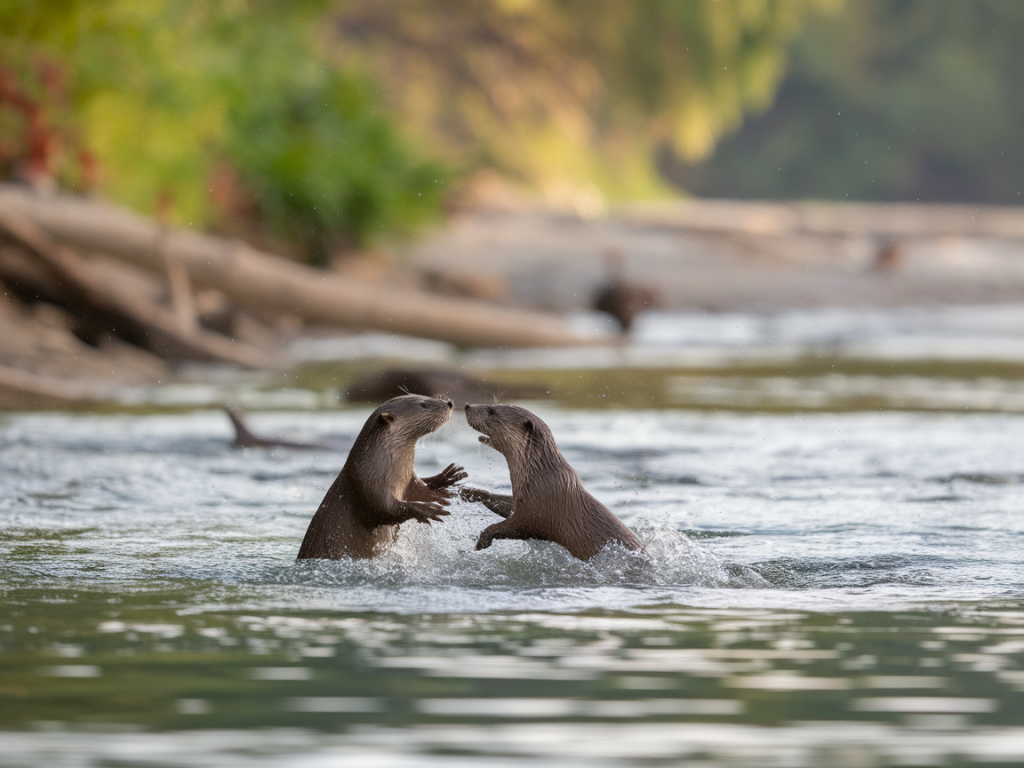
| Otter swimming or diving | 1/1000 – 1/2000s | f/4 – f/5.6 | ISO 800 – 3200 | AF-C with subject-tracking (eye detection if available) | Continuous high |
| Low light dawn/dusk | 1/500s+ (if possible) | As wide as lens allows (f/2.8 – f/4) | ISO 1600 – 6400 (use camera’s low-light performance) | AF-C, wide-ish zone | Continuous high |
Notes: I favour faster shutter speeds to freeze sudden lunges and splashes. If you have IBIS (in-body image stabilisation) and a lens with stabilisation, you can drop the shutter a touch, but movement in the scene (water ripples, sudden head turns) needs faster speeds anyway.
Lens choice and focal lengths
My go-to lens for riverbank otters is a 100–400mm or a 150–600mm zoom. These give me enough reach to maintain respectful distance yet provide framing flexibility. On a full-frame body, 300–600mm is often ideal; on APS-C cameras, a 200–400mm is a good compromise.
If you prefer primes, a 300mm f/2.8 or 400mm f/4 will yield excellent subject separation and low-light performance, but they’re heavier and more conspicuous. A mid-range telezoom like the Canon RF 100-500/Canon EF 100-400 or Nikon 200-500 and third-party options from Sigma/Tamron are excellent for wildlife photographers who want balance between weight, cost and reach.
Focus strategy and composition tips
Practical field tips and kit I carry
Reading otter behaviour: when to stay and when to go
Once an otter detects disturbance it’ll often leave the area for some time. If it stays, you can continue but limit flash, sudden repositioning or loud noises. If it dives and doesn’t return within a few minutes, it’s best to reposition yourself — continuing to wait in place can increase stress and may push the animal away from a preferred habitat.
Finally, share responsibly. If you post images online, avoid revealing exact locations of sensitive populations. I usually give general area descriptions and encourage followers to respect wildlife and habitat. Photographing otters is as much about patience and humility as it is about technique — the better you learn to be invisible and ethical, the more natural behaviour you’ll be able to capture.