Choosing between a 20L and a 30L rucksack for dawn landscape photography is one of those practical decisions that feels simple until you're standing at a misty viewpoint with a leaking waterproof and a tripod too big for your pack. I’ve spent thousands of hours walking and photographing across the UK, and I still weigh up this choice every time I plan an early-morning shoot. Below I walk through how I decide what to sacrifice and what to keep — gear, comfort, weather protection and the realities of hiking in low light.
Start with your typical dawn shoot: what do you actually carry?
Before thinking capacity, list the non-negotiables for your style of dawn photography. For me that list usually looks like this:
- Camera body (usually a mirrorless body)
- 2–3 lenses: a wide (16–35mm), a mid (24–70mm) and occasionally a tele or macro
- Tripod — often compact travel tripod but sometimes full-size for long exposures
- Spare batteries and memory cards
- Headtorch for navigating in pre-dawn light
- Waterproof and windproof shell
- Small food/snack, water bottle
- Map/phone and small first-aid or emergency kit
- Optional: filters, remote release, small beanbag
This is the baseline I try to fit. If your kit list is larger (multiple bodies, heavy telephoto lenses) you’ll soon need more than 20L. If you shoot minimal setup — one body, one lens, lightweight tripod — a 20L could be ideal.
What a 20L rucksack gives you
A 20-litre pack forces discipline. That constraint can be freeing: you pack less, move faster, and are less tempted to take unnecessary items. Here’s what I like about 20L packs for dawn shoots:
- Lightweight and compact. Easier to shoulder on narrow tracks, less bulk when climbing outcrops, and less strain on shoulders for long approach walks.
- Encourages minimal kit. You’ll reflexively bring what you need, not what you might need.
- Quicker access. Smaller packs with simple compartments mean you can pull out filters, batteries or a headtorch fast in the dark.
- Better for short walks and urban locations. If you’re parking close to the viewpoint or walking less than an hour, 20L is usually enough.
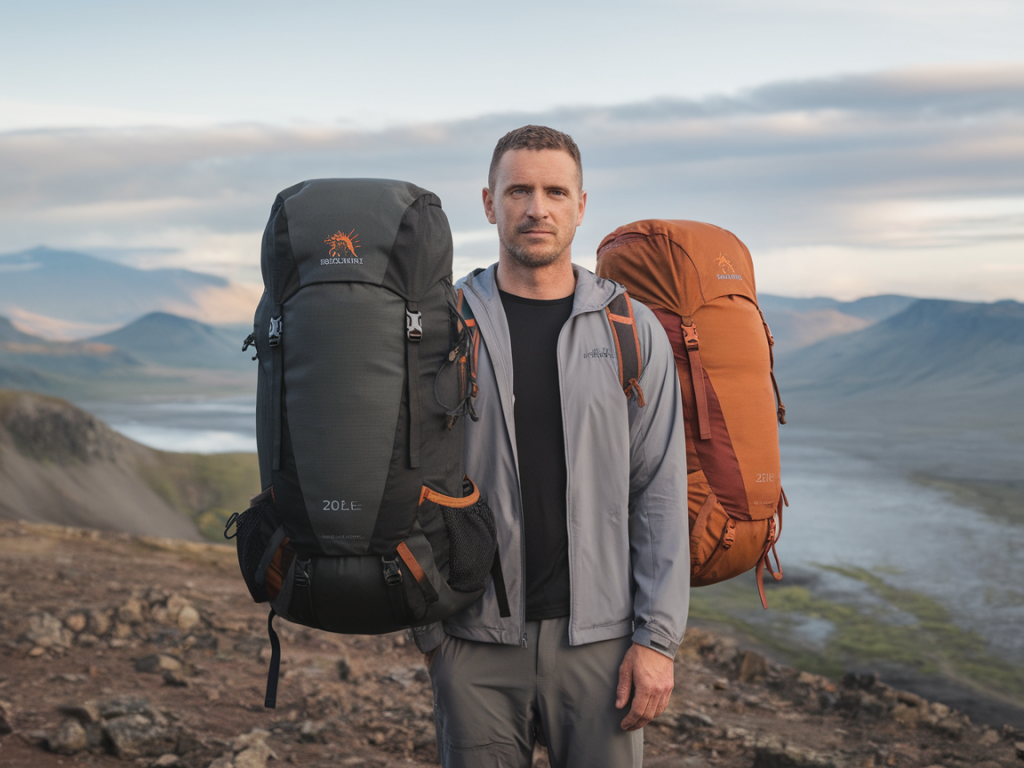
Brands I often recommend in this category include Peak Design Everyday 20L for photographers who prioritise organisation, and lighter daypacks like the Osprey Daylite or Montane Lite packs for those who prefer straightforward pockets and a small footprint.
What a 30L rucksack gives you
Jumping to 30 litres brings versatility. I reach for 30L when the approach is long, the weather uncertain, or the shoot might stretch into the day. Advantages include:
- Room for extra layers and thicker waterproofs. UK weather is famously changeable — it’s nice to have space for a fleece, waterproof trousers, and gloves.
- More camera and personal kit. You can carry an additional lens, a larger tripod, a thermos, and lunch without feeling cramped.
- Better for multi-location shoots. If you’re hiking between viewpoints or planning to stay out after sunrise, the extra capacity matters.
- Comfort on longer walks. Bigger packs often have more padding, better hip belts and load distribution which helps when you’re carrying 6–8 kg of kit over several miles.
Popular choices here are the Peak Design Everyday 30L for photographers who want modular organisation, or a proper day-hiking pack like Osprey Talon 33 / Kestrel 30 if you need a robust carry system for rough terrain.
Key trade-offs — what to sacrifice and what to keep
Deciding between 20L and 30L is about trade-offs. Here’s how I approach them:
- Weight vs readiness: Do you prefer to move fast and light, or be ready for anything? If you’re walking several miles in the dark, lightness reduces fatigue and risk. But if you might face rain, long waits for light, or want a spare lens, that extra capacity can save a shoot.
- Comfort vs stealth: A 30L pack with a larger profile can be more comfortable but more obtrusive (on narrow paths, clifftops or wildlife hides). A 20L keeps you nimble and low-profile for wildlife or sensitive habitats.
- Organisation vs simplicity: Many 20L camera packs prioritise organisation (camera cubes, quick-access pockets) but limit space for clothing. A larger hiker-style backpack offers room but fewer dedicated camera compartments unless you add an insert.
- Tripod choice: If you use a full-length tripod, a 30L is often necessary. Compact travel tripods (peak design travel tripod, Gitzo Traveler) enable 20L use.
Practical packing strategies for both sizes
Whichever size you choose, smart packing can make all the difference. These are my go-to strategies.
- Pre-pack a camera cube. Use a padded insert for lens protection. In a 20L, a small cube with body + 2 lenses fits snugly; in 30L you can fit a larger cube and still have clothing space.
- Tripod carry: Use external straps or side pockets. On 20L packs I often attach a compact tripod vertically along the back; on 30L I have room for a slightly larger tripod inside or more secure attachment points.
- Weather kit first: In UK conditions I prioritise a light waterproof and a dry bag for electronics. Put them at the top for quick access when a drizzle starts.
- Battery and cards in a top pocket: Keep spares accessible in a small zipped pocket or top lid so you don’t have to unpack everything at first light.
- Minimise duplicate items: One good-quality thermos rather than multiple drinks containers; multi-use filters (ND/grad combos) rather than a large filter kit if space is tight.
A simple capacity decision flowchart
| Question | Choose 20L if… | Choose 30L if… |
|---|---|---|
| Approach distance | Short walk under 1 hour | Long approach or multi-location hike |
| Weather uncertainty | Clear forecast, low chance of rain | High chance of rain or cold |
| Kit size | One body + 1–2 lenses + compact tripod | Multiple lenses, larger tripod, extra clothing |
| Comfort need | I prioritise speed and low weight | I need better load distribution and comfort |
Real-world examples from UK mornings
On a foggy autumn morning on the North York Moors, I used a 20L bag (Peak Design 20L) with a travel tripod, 24–70 and 16–35 lenses and waterproof shell. The approach was short and the bag kept me nimble hopping stone walls and icy tracks. The constraint made me pick the one lens I knew would cover the scene well.
By contrast, on a long walk across Dartmoor where temperatures dropped and rain swept in mid-morning, a 30L pack (Osprey Kestrel 30) proved invaluable. I carried an extra lens, full-size tripod, waterproof trousers and a thermos. The weight was higher, but I remained comfortable and prepared when the light shifted and opportunities changed.
Final practical tips
- Try before you buy: Load your kit into both sizes and walk 30–60 minutes. You’ll notice what feels right in real movement.
- Use dry bags: Regardless of pack size, waterproofing your kit keeps headaches away. I keep camera bodies in a small dry bag inside the camera cube.
- Consider modular systems: Camera cubes let you switch between a 20L and 30L pack while keeping gear organised.
- Be honest about tripod needs: If you regularly need long exposures and filters, plan for a tripod that dictates bag size.
Choosing between 20L and 30L comes down to your shooting style, the weather and how far you’re willing to carry. Personally, I own packs in both ranges: 20L for fast, local dawn shoots and 30L for long ridges, changeable weather and days I want to linger after sunrise. Thinking through the trade-offs and experimenting with loaded walks will quickly show which option fits your rhythm in the field.