On cold, wind-blasted mornings when I’m chasing the soft light over the sea, the last thing I want is moisture on my lens or my camera body getting drenched by spray. Over the years I’ve learned that a simple, lightweight waterproof shelter made from a tarpaulin can keep my gear dry, let me work low to the ground for interesting foregrounds, and collapse into a compact kit that won’t slow a cliff-top approach. Below I’ll walk you through how I rig a practical, adaptable shelter from a tarpaulin for dawn cliff-top seascapes—what I take, how I set it up, camera positioning, and field tips that save shots when the weather turns.
Why a tarp shelter?
A tarpaulin shelter is quick, cheap and versatile. Compared with purpose-built camera shelters it’s far lighter and can be adapted to different wind directions, cliff profiles and working heights. I typically use it when I want to sit low for a sweeping foreground (pebbles, wet rocks, coastal grasses) or when sea spray and drizzle are likely. It’s not a replacement for a full hides or heavy-duty housings if you’re saltwater-submerged, but for cliff-top work where spray and drizzle are the main threats it’s ideal.
What I carry in my camera shelter kit
- Tarpaulin: 2m x 2.5m lightweight silpoly or coated polyester tarp. I prefer a breathable, waterproof tarp with taped seams.
- Guy lines / cord: 4 x 2–3 m cords (reflective cord handy for early-morning visibility).
- Toggles / mini carabiners / clips: 4 small clips to attach cords to the tarp grommets or to webbing loops.
- Tent pegs / rock anchors: 6 short alloy pegs for soft ground, plus 4 small cord-slings or webbing loops for wrapping around rocks or clifftop features.
- Small tripod / low-mount: A compact ball-head tripod that can be placed low under the tarp (e.g. Gitzo Traveller or lightweight carbon Mefoto).
- Bean bag or microfibre pad: For resting the camera low and steady against spray.
- Microfibre cloths and silica gel sachets: For drying lenses and camera body; silica keeps humidity down in the shelter.
- Optional: A small groundsheet (thin) to keep kit off damp grass, and an LED headlamp for pre-dawn rigging.
Choosing the right tarp
Size matters: I find a 2 x 2.5 m tarp fits two people sheltering low and gives enough overhang to set multiple attachment points. Weight-wise, look for silnylon or silpoly (sub-300 g/m²) that packs small. Avoid thin, cheap polythene tarps that tear easily—ripstop construction and reinforced corners will save you when wind and salt tug. If you want a brand, I’ve used lightweight tarps from Sea to Summit and lightweight bivy tarps from Z Packs; both are compact and have durable tie-outs.
Site selection and safety
Before pitching, I spend a few minutes scouting: stand back from the cliff edge, check the ground for stability, and look for natural anchors like boulders, sturdy posts or fence droppers. Never set the shelter too close to an overhang that could be undermined by previous erosion. Wind direction is crucial—ideally the tarp’s lowest edge faces the sea so spray flows under but is still deflected away from your lens. If wind is onshore and strong, angle the tarp so there’s a windward anchor and a low seaward skirt that faces the tide; this reduces buffeting.
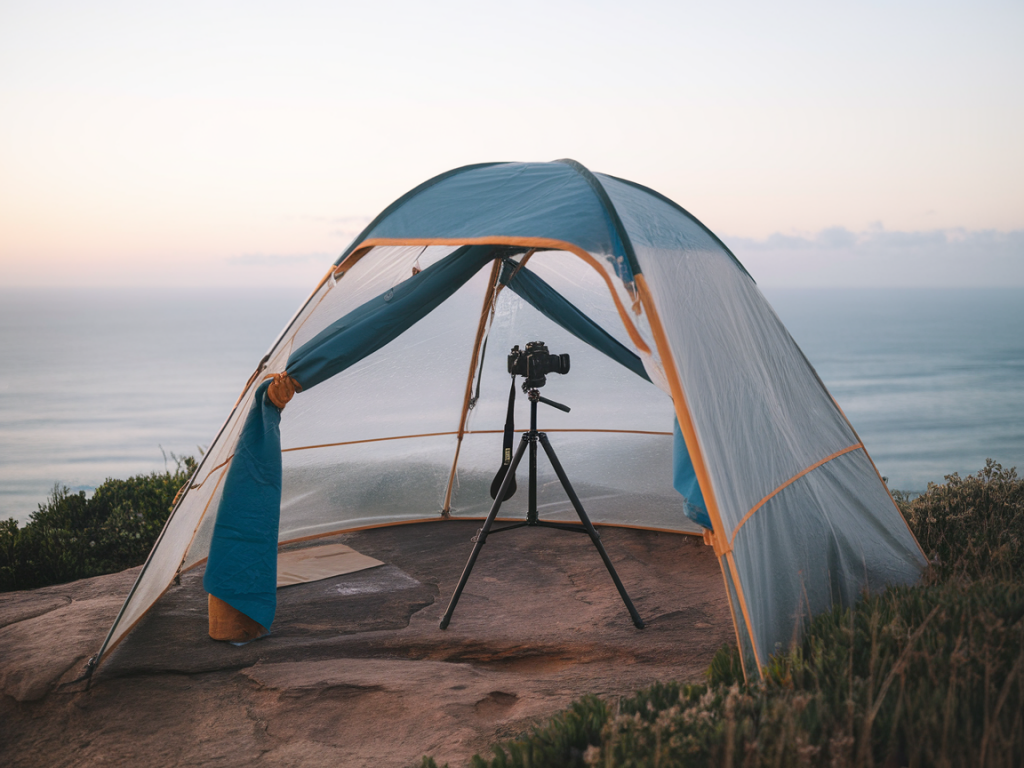
Simple rig for a low, front-opening shelter
This is the configuration I use most because it gives me a clear forward view and easy access to change lenses or adjust settings.
- Lay the tarp flat with the long axis facing the sea.
- Clip one short cord to the front-mid grommet and stake it down at a low angle toward the sea—leave a loose “skirt” so spray deflects.
- Use two rear tie-outs to anchor the tarp to behind-you rocks or pegs, pulling the tarp up into a shallow A-frame. These rear anchors should be higher than the front to create a sloping roof.
- Adjust the side cords to tension the sides, creating a clear opening at the front. I keep the front low and the sides slightly raised so I can peek out comfortably and place the lens through the opening without exposing the camera to wind.
- Set the tripod low inside, or use a beanbag on wet rocks. Run the lens through the front opening and rest the camera on a low pod so the body stays under shelter while the lens barrel projects slightly out if necessary.
Alternatives for extreme spray
If the sea is frothing and spray is heavy, I modify the shelter into an L-shaped windbreak: erect a vertical face to the prevailing wind with the tarp wrapped and lashed to a rock or fence post, and create a small internal alcove just big enough for the camera and my hands. This reduces the internal volume and cuts drafts, helping condensation control. In these conditions I keep lens filters on (UV or clear protector) so salt hits the filter and not the front element—clean or replace the filter as soon as possible after the shoot.
Camera placement and protection
- Keep the camera body inside the shelter as much as possible; allow only the front of a lens to extend beyond the opening if needed for composition.
- Use a short lens hood to reduce direct splash on the element; a longer hood can collect spray.
- Cover the camera with a thin rain sleeve if gusts push spray into the shelter. I use a flexible neoprene sleeve (similar to those by Think Tank) that slips over the camera and leaves controls accessible.
- Place silica gel pouches near the camera and in your kit bag to reduce damp; change them regularly.
Settings and composition tips for dawn cliff-top seascapes
My go-to approach at first light combines long exposures to smooth water and shorter brackets for crisp detail. Typical starting settings:
- Use an aperture between f/8 and f/11 for good depth and sharpness across the scene.
- If I want silky water, I use ND filters (6–10 stop) and aim for exposures 1–30s depending on wave energy. For subtle motion, 0.5–2s is often enough.
- ISO 100–200 to keep noise down during long exposures.
- Shoot in RAW and consider exposure bracketing for scenes with high dynamic range—cliff faces can be darker than the sky at sunrise.
- Focus manually or with back-button autofocus, then switch to manual to avoid hunting in low light.
Condensation and lens care
One thing that trips up photographers is condensation forming inside the tarp when the temperature rises with sunrise. To reduce this I aim to keep the shelter ventilated: leave a small gap at the sides if wind allows, and swap silica sachets between sessions. Wiping the front element with a microfibre cloth between longer exposures prevents salt and spray from building up and ruining the shot. I always carry two cloths—one for heavy salt and one for final polishing.
Quick troubleshooting in high winds
- If the tarp flaps: add an extra guy line and reduce the surface area exposed to the wind by lowering the tarp and tightening the sides.
- If spray is still getting in: reposition the front skirt lower and angle the tarp more to the wind, or create a secondary short windbreak with a backpack or spare clothing.
- If the tripod shakes: add weight to the tripod center column (water bottle in a dry bag) and keep the camera as low as possible.
Ethics and leaving the site as you found it
I’m careful to use existing tying points and large rocks rather than hammering in new stakes in fragile cliff vegetation. After packing up I check the anchor points and pull any cord or pegs from the ground, and never leave silica sachets or microfibre cloths behind. Keeping the shoreline clean and minimizing disturbance for nesting birds is part of responsible coastal photography—if there are breeding seabirds, I push setup further back and use longer lenses.
Rigging a lightweight tarp shelter is a practical skill that rewards a little practice. It keeps kit dry, lets you work low and stable and is small enough to carry on a walk that includes uneven ground and wet grass. With a few simple pieces of kit, some common-sense site selection and a habit of leaving no trace, you can get the shots you want at dawn without wrecking your camera—or the coastline.